

Year of 1983 Update Ⅱ Mokume-Gane
Submitted to S.N.A.G.“ Metalsmith” magazine, Printed in 1983, “ Metalsmith” Spring
By Hiroko Sato-Pijanowski
The following technical article con-sists of collection of papers by Steven D. Kretchmer M.F.A. candidate, 1982, Mark Morgan B.F.A.
1981 and Ruth Taubman B.F.A.
1981 of the School of Art of The University of Michigan under the guidance of Professors Hiroko Sato Pijanowski and Gene Pijanowski.
This research was supported by a Rackham Research Grant awarded to Professor Hiroko Sato Pijanowski in 1979 and completed in 1981.
Information concerning the traditional Japanese mokume-gane technique was introduced, in the form of a technical paper, at the Society of North American Goldsmiths' conference held at the University of Washington in Seattle in the spring of 1977. There was, and still is, a great deal of interest and enthusiasm for this unique technique. The simplicity of the process of forming the billet--numerous layers of compatible nonferrous metals and alloys adhering without solder, layers that will not come apart while stretching and forming--is appealing, as is the process of diffusion--the primitive fascination with fire, the beauty of the pattern suggesting wood grain inherent to the laminate and the limitless size of the patterned sheet.
Perhaps a minimum of 250 people actually practice the process, most having learned from workshops, and probaly a few thousand know of it from publishied articles. A few universities, particularly Southern Illinois University at Carbondale and The University of Michigan, have continued research to simplify the process, a view shared by Japanese mokume-paper craftsman Norio Tamagawa. A few innovations have been made, primarily in pattern development, utilizing blacksmithing methods and adopting industrial processes. We feel that the basic studyand practice of the traditional methods of mokume-gane have been understood and much has been achieved.
It has been more than 300 years since mokume-gane began to be practiced. The Japanese practitioners used metals of pure gold and silver, copper, shakudo, shibuichi, shiro-shibuichi, kuro-shibuichi and kuromi-do diffused with charcoal and coal. A kozuka made by Shoami Dembei, the originator of the technique in the 1600s, utilized pure gold and silver, copper and shakudo. One of the current masters, Mr.Masatashi Yagihara (1902- ) practices the technique with silver, shibuichi, kuro-shibuichi, shiro-shibuichi, shakudo and copper using a gas furnace. Mr Gyokumei Shindo (1892-1981), Mr.Nobuo Tamagawa (1941- ) and other craftsmen practice with copper, shakudo and/or kuromi-do and silver. The traditional coloration or patinatiom is produced by the use of a commercially available Japanese compound called rokusho, combined with cupric sulfate in a boiling or steaming solution of water.
Industrial heat-treatment facilities to fuse and diffuse hot metals and alloys include double-chambered oxygen-free kilns, stainless steel foil envelopes, T.I.G. welding, pressure plates of stainless steel and hot rolling in a vacuum. Kilns, forges and/or torches with the basic theme of producing an oxide-free environment or“heat”with electricity, gas, propane, coal, coke and/or charcoal are some of the options available, all dependent upon accessibility. One can ask: What of the future? Lasers? Rubbing two pieces of metal together, friction? Pressure only? Powdered metals? Electroforming? Dipping? Hot spraying? All of the above should be possible to create a“stack,”“sandwich”or laminate that is malleable, ductile, with good elongation characteristics.
What eles can be added to established traditions of mokume-gane--other materials, coloring formulas and/or patterns? The intention of the following papers is to explore a few possibilities, to adapt“knowns”to mokume-gane with the minimal facilities of a university metals studio.
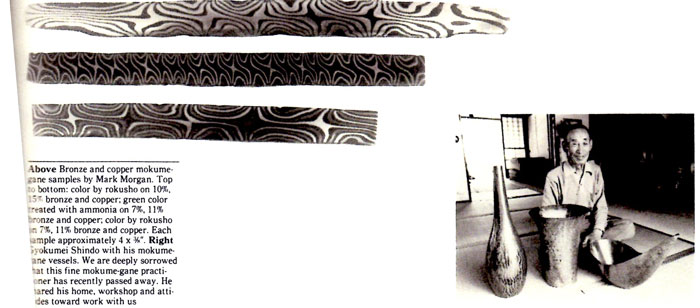
Mark Morgan was interested in bronze as an alternative material to be used in the mokume-gane process. He went back to ancient bronze which contained no zinc for his investigations into making his own alloy. He also wished to explore alternatives to the reddish brown, grays and blacks in patination with rokusho. With bronze he has learned to achieve greens and blues, some iridescent, or to retain thenatural color of the material.
Steven Kretchmer believed colored golds of the same karat would open new vistas for use in precious jewelry. His concern was wearability, since most metals and alloys used in mokume-gane ware chemically patinaed and could wear or rub off. The problem of hallmarking a mixed-metals piece was also a concern.
Ruth Taubman was interested in industrial equipment to produce mechanical patterns. Her other interest was the production of a pattern with minimal wastage, utilizing basic forging techniques.

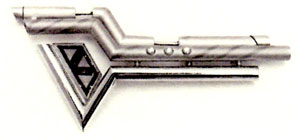
Above Steven Kretchmer, Ring,
18k golds; yellow, green, red, palladium white, nickel white; ruby, 5.5mm h. x 22mm outer diameter. Below right Hiroko and Gene Pijanowski, Earrings and Brooch, 10% bronze, kuromi-do, 3 1/4 x 3/4"
Above Steven Kretchmer, Ring, 18k golds; yellow, green, red, palladium white, nickel white; ruby, 5.5mm h. x 22mm outer diameter. Below right Hiroko and Gene Pijanowski, Earrings and Brooch, 10% bronze, kuromi-do, 3 1/4 x 3/4"
Notes
1.Pijanowskis, "Lamination of Non-Ferrous Metals by Diffusion; Adaptation of the Traditional Japanese Technique of Mokume-Gane." Goldsmiths Journal, August 1977, pp.20a-20h
2.Pijanowskis, "Update: Mokume-Gane (Wood Grain Metal)," Goldsmiths Journal, February 1979, pp.16-20.
Members of the Graduate Program, Southern Illinois University/Carbondale; compiled and edited by W. Ard, "Return to the Forge (Extended Research into Mokume-Gane and Granulation)," Gordsmiths Journal, August 1979, pp.A-G, reprinted in Metalsmith Papers of the Society of north American Goldsmiths, 1981. Ard, W., "Studio Mokume," Metalsmith, Winter 1981, pp.46-51. Pijanowskis, "Mokume-Gane," Goldschmiede-Zeitung--European Jeweler, Uhrmacher-Zeitschrift, 7-81, 1981, pp.7/50-7/53
3.Pijanowskis, "Mokume-Gane (A tribute to Three Japanese Craftsmen and Their Metalwork)" Craft Horizons, February 1978, pp.32-35
4."The small knife carried in a pocket in the scabbard ..." G.Stone, A Glossary of the Construction, Decoration ond Use of Arms and Armor, Jack Brussel, New York, 1961
5.Ibid., Pijanowskis
6.Hiroko attended a T.I.G. welding workshop organized by Professor Marcia Lewis at Long Beach City College in 1980, where she created fake mokume-gane by T.I.G. welding. Gold and copper wires were melted into fine silver sheet; they mixed like watercolors on paper. The metals used created new alloys of six or seven colors resulting in fascinating effects
UpdateII Bronze Mokume-Gane by Mark Morgan
This paper concerns the use of various bronze alloys, consisting of copper and tin, used in the traditional mokume-gane process. My object in this research was to find a bronze that could be diffused traditionally, thus making it possible to achiecve a gold color without using gold and also to widen color possibility in general. Toraditional bronze (copper, tin) has many patinas. To use bronze in mokume-gane means that the wide patina color range of these alloys can now be applied to patterned metal.
Most commercial bronzes tested proved unsatisfactory. A few commercial alloys would diffuse into a mass fairly well, but when worked to develop patterns, the billets had problems. The commercial alloy which I found to work the best in diffusion was a phosphor bronze. This is basically a copper-tin alloy with phosphor added. The problem with the alloy I used was that the phosphor content was too high, thus making the metal unsuitable for mokume-gane. My research into commercial bronze was not thorough or complete. I wanted to produce my own alloys so as to get specific qualities both in workability and coloration. After some research and experimentation, I found a suitable alloy which could be diffused and was workable hot or cold.
The alloy I worked with was a basic copper-tin mixture with very small portions of phosphor added. Too much phosphor will make the metal unworkable when hot and very difficult to work cold. The commercial phosphor bronze, with 0.5% phosphor or above, is used for bearings and machine parts because of its corrosion and wear resistance.
After making phosphorbronze alloys, my experimentations proved that this alloy is fairly workable hot or cold when the tin content remains under 10%. Above this, the metal rapidly becomes less and less workable. At around 20% tin content, the metal will shatter when worked cold. I discovered that it is very important to make the alloy properly.
Alloy Making. All the alloys I made were produced in small amounts (100-400 grams) in small clay or graphite crucibles. The heat source was either an oxygen-acetylene or natural gasoxygen torch. I also melted larger quantities in a blacksmith's forge in graphite crucibles with equally good results. The metal is alloyed by first melting the copper and then adding the tin, which is either wrapped in copper foil or is molten when poured. I slightly overheated the copper just before adding the tin to aid fusion.
The alloy must be kept as oxygen-free as possible while it is molten. Oxygen in the metal will make the alloy porous and weaken it for forging and manipulation. This is why small quantities of phosphor are added to the bronze. Phosphor serves to deoxidize the metal. driving off gasses and making the alloy much more suitable for working. All that is needed is a touch of phosphor to deoxidize the metal; later the phosphor is driven off leaving just a trace. However, if you add more phosphor than is necessary for deoxidation, it will remain in the alloy and affect it. I added approximately .005% phosphor to the alloys I made.
Phosphor in copper-tin bronze serves three main purposes. First, as mentioned, it deoxidizes the metal, rendering it more workable. Second, it makes the alloy more corrosion resistant, and, third, it keeps the tin in the alloy from being given off as oxides when the metal is heated or melted. A few other methods to deoxidize and keep the bronze clean are: keep the melten metal under a layer of charcoal in a graphite crucible when melting, or stir the molten alloy with a green branch from a tree just before pouring, a practice followed by ancient bronze workers.
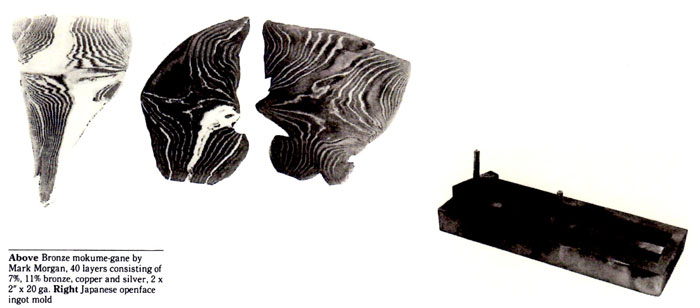
After the metal is fused well, it should be poured into ingot molds and remelted at least three times. This is necessary to make the fusion more complete. I used both a Japanese open-face and a closed ingot mold with equally good results. It is important to pour the metal smoothly and as fast as possible without creating too much turbulence. The ingot mold should be warm and dressed with carbon.
Alloys I worked with ranged from 1% to 25% tin. The color of this range progresses from copper color(1%), to orange-gold (5%), to gold-yellow(10%), to light yellow(15%), to white (20%). I diffused and manipulated this range with good results.
Could working can easily be done with alloys from 1% to 15% tin, although manipulation of the metal is less difficult when working hot. Above 15% tin content hot working becomes necessary. To avoid having to use industrial equipment for hot rolling, I purchased a 120mm hand rolling mill which I use for hot rolling only. This worked well for me, and the machine, if used carefully, will hold up well.
Laminating. In laminating, careful consideration must be paid to the melting points of the alloys to be used. These must be fairly close to insure good diffusion. If one alloy has a much lower melting point than the other metals combined in a billet, it must be placed between all other layers. For instance, a billet containing layers of copper, 5% tin bronze and 15% tin bronze should be stacked with the 15% tin bronze between all other layers, as the melting pointe of copper tin bronze lowers with the addition of tin. (See Table I For melting points of bronze alloys.) The layers of bronze and/or other metals, such as copper, silver, and so on are cleaned as usual, stacked and bound with steel places and bolts.
I used a blacksmith's forge and coal as my heat source. Industrial coke will work just as well. As usual with the diffusion process, the metal must be heated evenly and withdrawn from the fire when it "sweats." The length of time it will take to reach diffusion temperature will depend on the heat source and to what degree you apply it. Even heat is inportant, not speed. Work slowly and carefully. In general, the diffusions I did took 20 to 30 minutes with billets 2"x2", consisting of 20 layers of 18-gauge metal.
Patterning and Forming. Traditional pattern development was applied to bronze mokume as well as twisting and relamination of billets with success. Various forming techniques were used with the bronze also. The laminated bronze held up well to hammer work of all kinds, forging and raising. I relaminated a billet of 20 layers consisting of 7% bronze, 11% bronze, copper and silver to make a billet of 40 layers. This billet was forged out and twisted to create star patterns. Hiroko raised a bowl made from a billet containing 6% bornze and copper with no difficulty. Also, I have dapped and raised domes with no trouble.
Coloration. The possibilities for coloring bronze mokume-gane are numerous. Any patina that has been used for copper alloys should be tried. My experiments with traditional copper alloy colorations led me to produce a great range of colors new to mokume-gane, from iridescent rainbow spectrums and vivid green-blues to golds and natural browns. Coloration of copper and copper alloys used in patterned metals is still open to much experimentation.
One coloration I achieved with rokusho involved a billet of 7% tin bronze, 11% tin bronze and copper. The 11% turned gold, the 7% turned light gold-brown and the copper deep brown. A very nice color conbination is achieved by diffusing a higher tin bronze, such as 10% with kuromi-do and color with rokusho. This produces a deep gold color in the bronze with the black of the kuromi-do. The high contrast of this combination is beautiful. Other colorations resulted from using liber of sulphur, shown on Table I. The bronze mokume can also be left to color naturally from oxidation, giving deep to goldish browns.
In conclusion, bronze consisting of copper and tin, within a certain tin percentage range, can be diffused and manipulated into patterned metal. When working with copper-tin bronze, the work must be done slowly, properly and carefully. The table provided here is meant to aid in planning a billet and to help determine melting points. It lists several alloys with their working qualities and some coloration information.
Notes
1.Members of the Graduate Program, Southern Illinois University/Carbondale; compiled amd edited by W.Ard. "Return to the Forge (Extended Research into Mokume-Gane and Granulation)," Goldsmiths Journal, August 1979, reprinted in Metalsmith Papers of the Society of North American Goldsmiths,1981 References
Aitchison, Leslie. The Casting of Non-Ferrous Ingots, London: MacDonald & Evans,1953 Hiorns, Arthur H. Mixed Metals, 1890,pp.224-229
Sexton, A. Humboldt. Alloys, Manchester Scientific Publishing Co. Wilson, H. Silverwork and Jwelry: A Textbook for Students and Workers in Metal, 1902. London: Pitman, reprint, 1951
Table I Bronze Mokume-Gane
| Malleabillity | MNaturak Color | ||||||
|---|---|---|---|---|---|---|---|
| Tin Content | Melting Point ℃ |
Hot | Cold | Sand Paper Finish |
Air Oxidized |
Color by Rokusho |
Color by Liver of Sulphur |
| 0% (copper) |
1084 | Excellent | Excellent | Pink-Lightt Red |
Brown | Orange to Brown |
Deep Gray |
| 5% | 1050 | Very Good |
Very Good |
Yellow Red |
Light Yellow Brow |
Yellow Ochre |
Gray Red Brown |
| 10% | 1020 | Good | Good | Gold Yellow |
Yellow Brown |
Deep Gold |
Deep Red Brown |
| 15% | 960 | Good | Fair | Light Gold |
Light Yellow Brown |
Yellow Gold |
Red Brown |
| 20% | 900 | Fair | Poor | White | Light Yellow |
Yellow White |
Purple Red Brown |
| Kuromi-do | 1070 | Excellent | Pink- Light Red |
Brown | Dark Brown Black |
black | |
UpdateII 18K Gold Mokume-Gane by Steven Kretchmer
Mokume-gane is made of metals of different compositions that are laminated by diffusion, manipulated and colored to create exciting patterns. Traditionally, mokume-gane is done with metals that need chemical treatment to bring out the colors. I felt that mokume-gane could be done in alloys that have different colors inherent in their composition and need not be patinaed, therefore being more suitable for jewelry.
For years I had imagined swirling colors of gold and was determined to make some that could be used as metal stock for unique jewelry pieces. The rerity, beauty and noncorrosive nature of gold makes it universally desirable. Karat gold has a wide range of colors and can now be diffused and patterned like other metal laminates. I prefer 18-karat alloys for their rich color and workability.
Compatible golds for a mokume-gane billet must be diffusible and able to move at the same rate. That is, once diffused, they have to forge, roll out, twist or bend without layers shearing one from another due to different malleabilities. Alloys. Eighteen-karat golds can be alloyed to offer a variety of colors. Some 18-karat alloys, compatible for diffusion are shown in Table ㈼. Melting temperatures given in the table were derived from sources in References and may vary. Note that pure platinum can be dif- fused with gold, but the alloy at the diffusion plane is too brittle for manipulation. It can be used for a striped pattern. Using the listed alloys, the high contrast combination is green, red and white. A more subtle and overall golden color may be made with yellow, pink and white.
Alloying. The pure materials for an alloy are weighed out into the proper proportions and set aside. A vertical ingot mold is used. (An open mold is not used because it results in an ingot with a "top" and a "bottom" with varying porosities.) The mold is smoked with soot on the inside to prevent the gold from adhering. The mold is then set and propped at a slant to allow the metal to enter with very little turbulence, just as beer poured down the side of a tilted mug prevents foaming. It is a good idea to preheat the mold to vaporize any residual moisture to prevent explosion when the molten alloy is poured.
An open melting crucible containing the metal is held in a crucible holder. Keep separate crucibles for different colors in order to prevent gold residue from changing the colors of a new alloy. The palladium-gold alloy residue would become inclusions in the other alloys because it has a much higher melting temperature. The metal is melted using borax as a flux to prevent oxidation and to break the surface tension of the metal when melting.
It is best to start by melting the metal with the highest melting point, then the next highest and so on. For example, when alloying yellow gold, melt the copper, and the gold, then the silver. Use a neutral, nonoxidizing foame, hot enough to melt fast, but using a rich enough mixture to prevent unnecessary oxidation. During the melting, add a little pinch of flux now and then. Encompass the metal with the flame throughout the process to prevent any air from attacking the more corrosible metals, but keep the flame out of the way when salting with the borax to allow the powder to melt onto the metal and crucible and not be blown away by the force of the flame. Stir the alloy by jiggling and rocking the molten metal contained in the crucible until it is well mixed. Enveloping the metal in flame, lift the crucible to the opening of the tiled ingot mold. Add a sprinkle of borax and pour through the flame into the mold. The flame should cover the metal, the lip of the crucible and the opening of the ingot mold. It should be poured quickly, but not dumped. This assures a consistent metal without splashing or trapping air. Overheated molten metal will pour out to an overly porous ingot, and underheated metal will not pour well at all. A bad ingot can be remelted. It might take a little experience to arrive consistently at an optimum ingot. With a good ingot the next step is to roll it into a sheet.
Preparation of Layers. The ingot is pickled ane the flashing filed off. Roll the metal in one lengthwise direction to the desired thickness, annealing before the edges of the sheet begin to show very tiny cracks. (Sensing this point coms with experience.) The metal must be bubble-free. If npt, blisters will show up during annealing. All of the alloys listed can be quenched in denatured alcohol after annealing. Alcohol is a slower quench than water, more appropriate for annealing these gold alloys. A metal container with a lid for the alcohol works fine. (Beware that alcohol can ignite from the red-hot metal. In case of ignition, one should be prepared to calmly cover the container with the lid.) The rolled strip is cut to length and flattened for the billet. Layers are sanded on borh sides with 320-grit paper, and care is taken not to get fingerprints on the surface.
Stacking. Stacking order is inportant. Any two aforementioned alloys are compatible for diffusion, but when a third alloy is introduced, the procedurebecomes more complex. A metal with a lower melting temperature must surround that of the highest and be diffused into separate three-layer stacks. Then a second diffusion must be done to introduce the third alloy of the other melting temperature between the three-layer stacks. This assures crisp color definition.
Diffusing. Layers are tightly bound with double-twisted binding wire. A torque plate is too massive and it is difficult to accurately monitor a one-or two-ounce billet if the edges are not very well visible. The billet is diffused in the normal reduction atmosphere used in the mokume-gane process, and a torch can be used for small quantities. It is heated evenly and thoroughly until fusion becomes visible around the edges. Care should be taken when heating tha billet to avoid melting and thus destroying it.
Conclusion. Having successfully used gold in the mokume-gane process, I can now integrate tra- ditional goldsmithing techniques in making jewelry with pat- terned gold. Research continues with other colored 18-karat golds. Patterns that have been explored in ferrous and nonferrous materials for centuries can now also be explored with precious metals to expand the possibilities of jewelry design.
References
Carter, F.E. Gold, Silver, Copper Alloys. New York: Am. Inst. of Mining and Engineers, 1928
International Gold Corporation. "Gold Alloy Data," Aurum, Number2 (English edition), Geneva, Switzerland: International Gold Corporation, 1980, pp.15-18
International Gold Corporation. "Gold Alloy Data," Aurum, Number3 (English edition), 1980,pp.15-18
Susz, Christian P. "18 Carat White Gold Alloys," Aurum, Number 4(English edition), 1980 pp.11-18
Taimsalu, Parn. "Le Leghe d'Oro a 18 Carati," Aurum, trial edition (Italian), April, 1979, pp.6-10
Vitiello, Luigi. Oreficeria Moderna, Terza edizione, Milano, Italy: UlricoHoepli Editore, 1976
Wise, E.M. "Gold Alloys," Metals Handbook, Cleveland, Ohio: American Society for Metals, 1939,pp.1504-1508
Left Steven Kretchmer, Bow Peace Pin, 18k golds: yellow, blue, palladium white, nickel white; 24k gold, tourmaline, diamonds, 55 x 51mm. Above Steven Kretchmer, Tubular Pin, 18k golds: yellow, Pink, palladium white, nickel white; 14k gold, citrines, amethyst, diamonds, 29 x 63mm
Table II Alloys
| Proportion of Composition by Weight | ||||||
|---|---|---|---|---|---|---|
| Malleability | Color | Au/1000 | Pd/1000 | Ag/1000 | Cu/1000 | Melting Temp℃ |
| 1 Most | Green | 750 | 230 | 20 | 975 | |
| 2 | white | 750 | 250 | 1400 | ||
| 3 | Yellow | 750 | 170 | 80 | 925 | |
| 4 | Pink | 750 | 80 | 170 | 882 | |
| 5 | Least | Red | 750 | 20 | 885 | |
UpdateII Mokume-Gane Pattern Research by Ruth Taubman
The literal translation of mokume-gane is wood-grain metal, a descriprion of the traditional patterns of Japanese alloys laminated by diffusion. Pattern is achieved by alternate cycles of removal of metal by hand carving or chiseling and hot forging to expose layers of contrasting color. This method of patterning results in an organic linear design, thus the relation to wood grain.
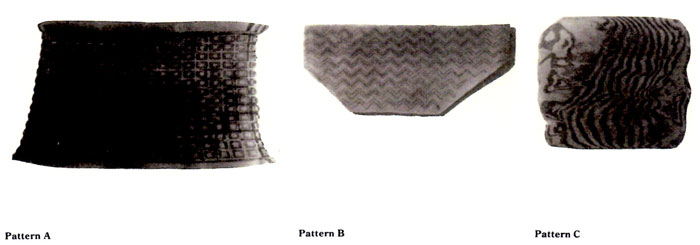
Limitless variation is possible in both the design and method of produsing patterns. The first step is to decide on the composition of the billet to be patterned. The alloy, gauge and amount of laminates to be diffused must be determined by esthetic and technical considerations. For example, visually, a bold pattern may require stark color contrast, variation in line thickness and varying numbers of each metal. However, choice is limited by compatible melting points and malleability among the components of the billet. The next step is to devise a method of exposing the various layers of a diffused billet. This research centers on two methods of patterning: patterns produced by use of a milling machine and those produced by end-grain forging. The following details the method and materials used to achieve the machined grid and zigzag patterns and the hand-forged single diffusion and rediffused patterns featured in this article, hereafter referred to as patterns A,B,C and D, respectively.
Preparations for Milling. Several objectives were encompassed in the investigation of machined patterns. The two primary concerns were to produce a controlled, dense pattern and move away from traditional organic pattern forms. In using a milling machine, the depth and direction of each cut can be con- trolled with a precision not possible in even the most tedious handwork.
The standard billet used in the milling process was a 16-layer deffusion of alternately arranged 18-gauge copper and kuromi-do, a Japanese alloy of 99% copper and 1% metal arsenic. These components were chosen for their similarity in melting points and handling properties, as well as their color difference to facilitate clear depiction of results. The billet's initial thickness was reduced by hot forging and then cold rolled to 1/8". It is necessary to roll the metal in order to achieve a uni- form thickness to be milled. Variations will produce an uneven depth of cut. The billet was not annealed after the final rolling, as "crisper" metal pro- duces a cleaner cut. Parallel edges of the billet were cut and filed to attain an exact width. The piece was then clamped in the mill's vise on edge and the cut sides were trued with a square end bit to provide a flush fit when secured in place for cutting. Steel bars measuring slightly less than the width of the billet were stacked beneath it in the vise to raise it to the proper height and prevent the billet from bending under the pressure of the cut.
Milling Procedure. A Bridgeport vertical mill, circa WWII, was my workhorse. The Bridgeport's speed and direction of cuts are controlled manually along perpendicular axes. One complete revolution of each directional control produces a cut 2/10" in length (this increment was used as the module for pattern B). The first tests on the mill were done on a piece of 1/8" copper, as it had virtually the identical properties of a copper/kuromi-do billet. This allowed practice without having to produce an extra diffusion. A 1/8" two-flute ball-end mill bit with a 3/8" shank was used for the initial cutting work. Following the de- struction of several bits, it became apparent that a noncarbide tool would not withstand the wear of milling copper. Carbide mill bits are generally available only with flute and shank of equal size. Many mills' chuncks will not close down far enough for fine cutting bits. A device called a collet will adapt a chuck for smaller bits.
The size of a cut is determined by several factors. If a billet is to be milled on both sides, the depth of each cut should not exceed one-quarter of the total thickness of the billet. A billet milled on one surface may be cut to a depth one-half the thickness. The depth of the cut is limited by the measure of the radius of the ball-end bit. Therefore, a 1/8" bit produces a cut 1/16" deep and 1/8" wide. Cutting deeper than the curve of the bit produces a trench with straight walls. This condition should be avoided, as straight sides will fold in when forged. These undercuts will eventually appear as surface cracks which must be ground or filed out, destroying or obscuring the desired pattern. Ideally, a cut should be a shallow, rounded gutter. This configuration exposes as many layers as pos- sible, rendering a dense, rich pattern. With an objective of revealing multiple strata with the least amount of cutting, a billet for milling should be no more than 1/8" thick.
A billet is patterned by a series of shallow cuts to attain a specific final depth. Each course of metal removal should not exceed .015", or 1/64", in depth. This measure is optimal for both a smooth cut and maintaining a sharp bit. The key to cutting on a milling machine, however, is speed. The motor speed for all cuts preceding the final course should be 600-800rpm. The final cut should be done at 1,000rpm, as this gives a very clean cut and smooths out any slight ridges produced by the bit dur- ing previous cuts. Another fac- tor is the speed at which the bit is moved through the piece. This can be summed up in one word: slowly. The primary causes of dulling bits are pushing the bit too quickly and inadequate lub- recation. There should be no sign of bending as the bit goes through the metal. Basically, one has to get a feel for letting the bit eat through the metal. For those familiar with machining steel, copper alloys are much "stickier" and tend to gum up the bit. It is therefore very important to liberally and constantly lubricate the work with a light cutting solution, for example, 50/50 kerosene and cutting oil. In addition, cut particles and shavings should be frequently brushed away to provide a clear cutting path. Any burrs which remain upon the completion of milling should be removed from the billet before it is reduced to sheet.
Proximity of cuts differs between hand and milling machine patterning. Hand-cut patterns result from repeated courses of cutting and forging. A billet is often lightly etched or colored between cuttings to reveal unpatterned areas which are subsequently chiseled or drilled. The density of the pattern develops in a progression. Machined patterns are reduced to final sheet thickness after one course of cutting is completed. For this reason, a pattern must be preplanned and cuts made very close together. When designing a pattern, it is impor- tant to consider the amount that the billet will spread from the milled thickness to a particular sheet gauge. It is difficult to remill a billet after it has been partially rolled down, as it is too thin. If a dense pattern is desired, leave as little uncut surface area as possible.
Pattern A was based on a grid 3/16" on center. Each cut was 1/8" wide by 1/16" deep. The uncut surface which re- mains from this cutting pattern appears as raised squares resembling a miniature waffleiron. Each of these squares measured 1/16" by 1/16". The final pattern appears as a rectangular grid due to the limitations of a 5" wide rolling mill used to flatten the billet (see Pattern A illustration). Thus, to achieve an 18-gauge sheet, the billet was stretched farther in one direc- tion. If rolled on the bias, a dia- mond pattern would result. The mottled appearance of black among the concentric rectangles is a result of a variation in the depth of the cut by one layer. while unintentional, this tends to lend a softer, more interesting look to a very ordered structure. A total of seven to eight layers are visible.
Gide lines were scribed on the surface of the billet at 3/16" intervals. Each cut was made in four passes of 1/64" increment depth each for a total depth of 1/16". The bit was successively lowered 1/64" after all lines were cut in one direction. This proce- dure was repeated until the total desired depth was reached. The entire procedure was repeated for the lines perpendicular to the first course of cuts.
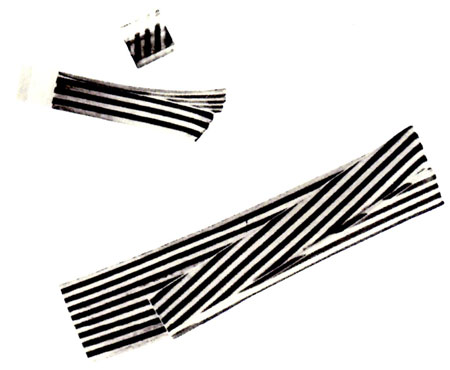
Pattern B was based on a "step" pattern. Each row was cut in perpendicular segments measuring .2"in length. This distance resulted from one com plete turn of each xy axis movement control and was therefore chosen as an easily measured module. The distance between each row was .15" on center. Each was 1/8" wide by 3/64" deep made in three passes, 1/64" deep each. A total of three to six layers was visible. The billet was reduced to a sheet by running it through a rolling mill at a 45゜angle to the cutting pattern, thus stretching the perpendicular "steps" to 105゜angle zigzags (see Pattern B illus- tration).
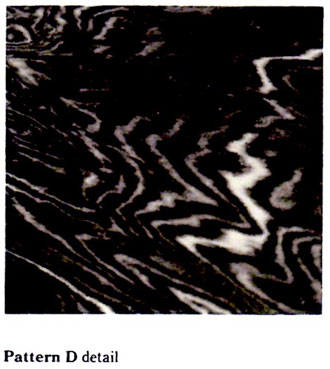
Patterns C and D are both a result of the same procedure of end-grain forging, differing in nunber of layers. The billet for pattern C was a 16-layer diffusion of alternately arranged 18-gauge copper and kuromi-do. The billet for pattern D was a result of rediffusion. An original 16-layer billet of 18-gauge copper and kuromi-do was diffused and reduced by hot forging to 14 gauge. This sheet was cut into six 2" by 2" pieces and rediffused. Thus, the rediffused billet for pattern D was 96 layers.
Mokume Meltdown at Carbondale by Stephen A. Walker
In January of 1982, Southern Illinois University at Carbondale hosted a National Endowment for the Arts-sponsored workshop on mokume-gane. SIUC has for six years engaged in ongoing research into the mokume-gane process and its applications. The results of previous SIUC research have been published in "Return to the Forge," Goldsmiths Journal, August, 1979 (reprinted in Metalsmith Papers, 1981), Metalsmith, Winter,1981. The purpose of this workshop was to bring together innovative artists in the field, as well as to dissemi- nate information to a larger group of participants consisting of repre- sentatives of prominent university metalsmithing faculties from across the nation and current SIUC graduate students.
The workshop functioned in a spirit of experimentation and inquiry. Previous investigations in mokume have revealed a great deal about this process, but have also produced a tangled web of theories, procedures, rules and practices with varying degrees of validity. At the beginning of the workshop it was clear that each practitioner of the mokume process adhered to a particular set of rules, often quite different from one another. As the workshop progressed, a great deal was learned about what really is necessary to make successful mokume and what is needless or redundant. By polling the participants after the workshop and conducting a systematic comparison of about 40 billets, it has been possible to further clarify the results.
Attending the workshop were: Al Ching, Garret DeRuiter, Phillip Fike, Richard Helzer, Mary Lee Hu, Thomas Markusen and Kurt Matzdorf. SIUC graduates Phillip Baldwin, Marvin Jensen and Michelle Crespi, all of whom contributed to mokume research at Carbondale, attended the workshop, as well as current SIUC students. Professors Brent Kington and Richard Mawdsley of SIUC were the hosts. The participants of the workshop were paired so that each visiting instructor worked with an SIUC student. Each team made at least three mokume billets during the course of the six-day workshop.
The workshop involved introductory discussions of the various procedures followed by hands-on experience in the studio. The dis- cussion/lectures were far from step-by-step instructions. Several optional methods were explained, and the teams tried the methods that seemed most sensible to them.
Preparation of Metals. The first step to be explored was preparation of metals for laminating. Commercially available sheet stock was used for the first billet. Thanks to research by Phillip Baldwin, the usefulness of readily available commercial alloy sheet stock has been made known. The workshop used red brass (Copper Development Association alloy #230), yellow brass (CDA #260), naval bronze (CDA #464), nickel silver (CDA #752), oxygen-free copper (CDA #102) and copper (CDA #110). The workshop used the oxygen- free copper for making traditional Japanese alloys. Also useful are Everdur silica bronze (CDA #655) and cupro-nickel alloys CDA #706 and 715. All these alloys are available from sheet matal firms in this country and are hot forgeable. It should be noted that these are all unleaded alloys.
Traditionally, sheets are prepared by a tedious, seemingly endless, process, involving annealing, pickling, flattening and sanding with abrasive papers to achieve a very fine surface. Thanks to those who are always looking for an easier way, some minimally timeconsuming procedures have been discovered which adequately prepare the surface for bonding.
The least time-consuming sheet preparation method is sandblasting. We found a glassbead blaster satisfaction for cleaning the oxides and dirt from the surface in a short time. The second method of cleaning sheet was a strong acid dip. We used a nitric acid solution of from 50% to 25% for several seconds, with a rinse in baking soda and water. It was dried quickly to retard further oxidation of the clean metal. A third method of cleaning sheet, closer to the traditional method, may be preferred by many craftsmen, since it doesn't require the expense of a sandblaster nor the risk of exposure to acid and fumes. The sheets are pickled in Sparex to remove oxides and then scrubbed with a scouring powder, such as pumice or rotten stone (sometimes with a little detergent). Again, they are rinsed and dried quickly.
When using torque plates to clamp the metals to be fused, it is not necessary to anneal the sheet in preparation; moreover, the metal sheets need not be absolutely flat, since the pressure from the plates will insure complete surface contact.
Laminations. The most consistently successful bonding technique was to place the stack intightly bolted torque plates in a preheated kiln. The temperature should be no higher than 100゜F below the lowest melting point of the alloys in the stack, but should be near this maximum. Most alloys used will dependably bond at 1500゜F and under pressure will bond at much lower temperatures. However, for complete bonding and low risk of failure, temperatures near the maximum are best. After the billet has risen to bonding temperature it is very important to maintain it there for at least half an hour. For a 3" by 3" billet, 2" thick, in 1/2" steel torque plates, a heat-soak time of 1 1/2 hours is recommended. It is possible to fuse billets in much shorter times, but this results in a higher rate of failure.
After the billet is removed from the kiln, most teams proceeded in the following manner. The billet in its torque plates was placed in a vise and quickly squeezed. Billets with alloys having lower melting points, or silver, tend to "sweat" a molten or semimolten flow of metal. These should be squeezed hard, We were able to get as much as 1/8" comperssion by doing this. After being squeezed, the billet is returned to the kiln for reheating.Then the plates are removed and hot forging begins. The necessity of keeping the metal hot varies from alloy to alloy. Some alloys, especially nickel silver, tend to split apart if they are allowed to cool before they are forged.In any case, it is recommended that the billet be forged to one-half its original thickness before it is allowed to cool. Alloys containing more than 10% silver are "hot-short" and will crack if forged at red heat. These alloys and the billets containing them should be forged at a black heat. (To determine a black heat, the metal should be heated to a dull red and cooled until the glow is no longer visible. It is then safe to forge.) Hot-forgeable alloys are best forged at a red or yellow heat.
A tally of the failures shows that the most common cause of delamination was insufficient heat or heat for too short a period of time. Allowing the billet to cool prior to forging was also inplicated in several partial failures, as it caused cracking especially along nickel silver layers. Several billets were left too long in too hot a kiln, so that the alloys with low melting points melted out.
Alloying. The workshop also dealt with the mixing and pouring of traditional Japanese alloys and with the forging and rolling these into usable sheet. Shibuishi alloys were poured using graphite crucibles in coal forges and 10-ounce or 30-ounce steel ingot molds. The constituent quantities of oxygen-free copper and silver ware placed in a preheated crucible and covered with a firebrick lid. As the metal melted, a small handful of lump charcoal was added to the crucible to aid in the absorption of gases, particularly oxygen. When the metal was melted, it was poured into the mold, which was heated only enough to drive off moisture. This allows the matal to chill as quickly as possible and retards the growth of large crystal structure. If the surface of the ingot is similar to tha surface of a galvanized pail and large crystals are visible, the metal was poured too hot and will be prone to cracking. An ingot such as this should be remelted.
Ingots are best reduced to sheet if they are hot forged prior to rolling. The time it takes to reduce the cross-section of a plate is much shorter if done by hot forging than by rolling. This is especially true if power hammersare avaliable. Perhaps more important than the time factor is the change in the crysta structure that hot forging causes. The crystals of the metal are broken into smaller crystals during forging, making a metal body which is more plastic and less prone to cracking than a brittle, cast crystal structure. Cracking is less likely if the hammer blows begin at the edge of the ingot and move in. Some metalsmiths prefer to do a course or two by hand prior to using a power hammer.
Handmade sheet is often characterized by hairline cracks and blisters. Some very coarse sheets have been successfully used in mokume billets; the blisters and cracks will fuse during tha lamination. Scratched or gouged sheet can also be used with little risk.
Stephen A. Walker is a graduate student in metals at S.I.U.
Year of 1977 Wood Grained Metal: Mokume-Gane
Mokume-Gane literally translates to mean wood grained metal. The technique of developing a pattern much like wood grain in metal laminae is a result of the principle of diffusion; the bonding of layers of metal, without the use of solder or flux, using at least two different colored metals or alloys compatible in their properties of ductility and malleability. The diffusion occurs by pressure and/or heat, which causes agitation and intermingling of molecules, atoms, ions, etc., at the interfaces of metal and/or alloy sheets. A new molecular crystalline structure is created between each of the laminae or layers, becoming then one homogenous mass. Patterns like wood grain then could be achieved after alternately carving and forging, resulting in topographical patterns. There are no limitations as to size, thickness or pattern. Mokume-Gane can be utilized in metalsmithing, construction, repousse and chasing, or as a material to inlay into or to be inlaid. It can enhance or itself be a piece of jewelry or holloware. In Japan it is primarily used in creating holloware.
Mokume-Gane was innovated by Denbei Shoami (1651-1728), who lived and worked most of his life in Akita Prefecture of Northwest Japan. He was a superb craftsman who was given permission to use the name Shoami from Shoam School, which started in Kyoto in the late 1500's. He was also supported by Satake who was then Kaimyo (feudal lord) in the Akita area. Mokume-Gane was Shoami's invention, but it was only one facet of his work. It should be realized that he was also a historically important craftsman who produced excellent examples in steel, of sword furniture, and sword fittings with carving and inlay. At first, Shoami named his technique Guri Bori because the pattern on his first nonferrous Mokume-Gane tsuba was like Guri, which is one of the Tsuishu techniques in lacquer work (Urshi), originating in ancient China. Tsuishu is one of the techniques where patterns are achieved by carving into thick layers of different colored lacquer; when line patterns are created, it is referred to as Guri. From sword making influences Denbei Shoami found that nonferrous laminates could be joined together to create patterns similar to lacquer work. He later named this pattern Mokume-Gane. His oldest work in Mokume-Gane was used in the Kizuka (sword hilt) using gold, silver, Shakudo, and copper. This technique was also called Itame-Gane or Yosefuki. There is no doubt that Denbei Shoami was influenced by the swordsmith and adapted those principles of forge welding to begin Mokume-Gane.
The reason why this technique developed in Japan was not only because of the highly developed skills in swordmaking, but the understanding of metallurgy and the numerous skills among metalsmiths. The unique existence of colored alloys employed by Japanese craftsmen was a contributing factor as the exchange of information and substantial availability of materials which helped to give birth to Mokume-Gane. There is one example of Mokume-Gane made by Soko Hirata, then a professor in the raising division of the University of Fine Arts in Tokyo in the early 1900's. Sonyusai Yoshida, while a pupil of Professor Hirata, produced a body of work utilizing Mokume-Gane. Yoshida eventually became Professor at the same school. The president of the university, Naohiko Masaki, named the technique Kasumi-Uchi. However, it is generally known as Mokume-Gane today, because the majority of the patterns created emulate wood grain.
There are no known historical examples of this particular method of diffusion of nonferrous materials to produce patterns inherent in the structure, other than in Japan. The closest example would be Sheffield Plate done in the United Kingdom beginning in the 1740's through the 1870's. Sheffield Plate is the cladding of silver over copper or nickel silver (German Silver) and was utilized for an entirely different reason; notably, to reduce the cost of the silver content within a product. Another example of Mokume-Gane would be in the central link of the chain of offices made for the Mayor of Preston, Lancashire, the United Kingdom, by Sir Alfred Gilbert in 1887-88. The process was done by using solder and flux and it is essentially a different approach. In the soldering application of the Mokume-Gane process, problems of air pockets, cracking and peeling occur. Its limitation are basically that it cannot effectively be formed or raised into complex shapes because of the solder itself and the different stresses enjoined in the metal laminae, if not compatible in malleability.
The authors started research into Mokume-Gane in Japan in the early 1970's, after exploring soldered Mokume during the mid to late 1960's. An opportunity to learn and share this technique with Norio Tamagawa, Gyokumei Shindo and Masatoshi Yagihara, has thus propagated the traditional method of Mokume-Gane. A wave of interest has spread among craftsmen of the West because of the similarity in the nature of diffusion, metals and/or alloys that can stick together without solder or flux and will not come apart. Several universities in the United States have researched this method and developed other possibilities in pattern development and utilized new materials, notably the University of Southern Illinois at Carbondale and the University of Michigan. The process involved with creating Mokume-Gane will be introduced in combining the methods innovated in Japan and developed from these traditional methods in the United States.
Preparation
Copper and Kuromi-do or Shakudo are used as the basic metal and alloys because of cost, malleability and coloring possibilities. However, the combination of materials could be any of the following:
| Metal | Quality | Color with Rokusho (JapanesePatina) | Melting Point (Centigrade) | Composition |
|---|---|---|---|---|
| Gold (24k) | Yellow | 1063. | ||
| Fine Silver | White | 960.5 | ||
| Sterling Silver | White | 893. | ||
| Copper | Orange to Brown | 1084 | ||
| Shakudo | 1 | Purple Black | 1050. | Gold (24k) / 4.8% Copper / 95.2% |
| 2 | Black | 1050 | Gold (24k) / 2.5% Copper / 97.5% |
|
| KURO SHIBUICHI: | 1 | DarkDark Gray | 1040. | Shakudo / 83.3% Shibuichi / 16.7% |
| 2 | DarkDark Gray | Shakudo / 71.4% Shibuichi / 28.6% |
||
| 3 | DarkDark Gray | 1040. | Shakudo /ツ黴58.8% Shibuichi / 41.2% |
|
| Kuromi-Do | Dark Brown to Black | 1070. | Metal Arsenic / 1% Copper / 99% |
|
| SHIBUICHI: | 1 | Gray | 950. | Fine Silver / 40% Copper / 60% |
| 2 | Gray | 900 | Fine Silver / 30% Copper / 70% |
|
| 3 | Middle Gray | About900 | Fine Silver / 23% Copper / 77% |
|
| 4 | Middle Gray | About 1000 | Fine Silver / 5% Copper / 95% |
|
| 5 | Dark Gray | About 1000 | Fine Silver / 3% Copper / 97% |
|
| SHIRO SHIBUICHI: | Light Gray | About900 | Fine Silver / 60% Copper / 40% |
The dimensions of the materials are dependent upon the needs of the craftsman in terms of pattern, size, and thickness of the sheets. Estimates of potential relationships between the starting dimensions and finished dimensions are listed:
BEFORE DIFFUSION:
Example / Width / Length / Thickness / No. of Layers
A / 5cm / 5cm / 1.6mm / 10
B / 7.5cm / 7.5cm / 1.6mm / 13
C / 10cm / 10cm / 1.6mm 20
AFTER DIFFUSION-FORGED & PATTERNED:
Example / Width / Length / Thickness
A / 11.5cm / 11.5cm / 1.6mm
B / 20cm / 20cm / 1.6mm
C / 37cm / 37cm / 1.6mm
After selecting more than two different nonferrous materials to be used, their thickness and size, the numbers of layers, and the sequence to be stacked, cut into the desired shape: square, round or rectangular. Remove any burrs that may be found on the edge of each sheet with a rough file. The sheets should be annealed, flattened, and pickled. With silicon carbide or any abrasive paper or cloth, abrade away heavy oxidation or dip in a solution of equal amounts of nitric acid and water and rinse well in water. Use fine pumice powder with a scouring pad or any other substance to degrease all the surfaces. Stack the sheets in the sequence selected handling carefully to avoid reintroduction of grease.
Prepare two mild steel sheets, approximately 6mm in thickness, to act as torque or pressure elements. Cut them at least one inch larger in each direction than the laminates and drill in the assembly. If the steel plates are new, paint with typewriter correction fluid or yellow ochre, as the steel plates might stick to the nonferrous metals during diffusion. The plates act as a weight, providing pressure, and as a heat sink. Assemble the torque plates, layers of metals and/or alloys with nuts and bolts as evenly and as tightly as possible.
If silver or silver alloys are used they should be placed in a steel box. The steel box will maintain a more even heat distribution and will keep the layers from sliding when sweating or diffusion occurs. A mild steel box of about 1mm to about .8mm in thickness is made to contain the silver laminates. The bottom dimension of the box should be the same size as the laminates; the height should be a little less than the total height of the stack for a maximum amount of pressure to be applied. The steel box should have a window, or opening on at least one side, so that the heat generated colors can be observed while diffusing. It is suggested to insert silver in between every layer of the remaining laminates, because of the silver's lower melting point as compared to copper, Kuromi-do or Shakudo.
Diffusion
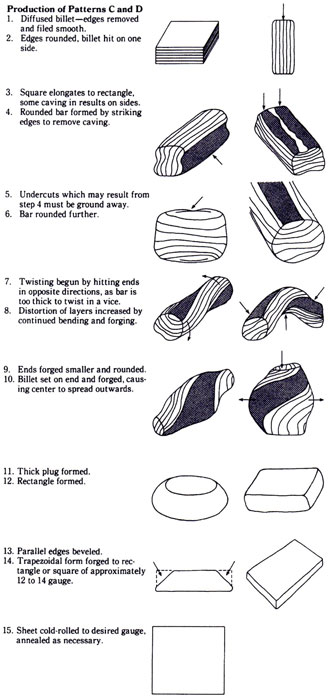
The diffusion is done in the blacksmithing forge using metallurgical coke for its capacity to produce sufficient heat and reduction atmosphere. Build three side walls with standard fire brick. Place a sheet of steel on top of the fire brick walls to act as a roof to contain the fire more efficiently. Ignite the coke and allow to burn halfway through or more. When there exists a strong fire, and it encompasses the entire cavity produced by the side walls, insert the assembly into the fire. The flame should now be producing a reduction atmosphere which is conducive for diffusion. Heat soak for about 10 to 20 minutes, dependent upon the mass; i.e., 20 layers of 10cm x 10cm x 1.6mm will take about 10 minutes to diffuse. It is a good idea to turn the assembly over a couple of times in the forge during diffusion, when the bottom of the assembly turns red for even distribution of heat. This is to be done in the flames of the fire to avoid oxidation of the metal. When the laminates turn red-orange, rotate the assembly frequently as it will soon begin to sweat. When the color of the entire assembly is almost bright orange, take out from the forge and cut the nuts and bolts off quickly with a cold chisel. When the billet is still red, hot forge from the outer edge to the center to avoid splitting.
When dealing with silver as a laminate, one should watch the silver only during diffusion. The timing is about the same as for copper and copper alloys. It is a good idea to place the assembly level in the forge, in case it begins to melt. When silver sweats, stop heating immediately and remove from the forge slowly, keeping the assembly level, and place on an anvil to cool and solidify. Proceed to cut off the nuts and bolts. Remove the billet from the steel box and forge when the silver contained diffusion is at black heat; the heat at which all the red heat has dissipated. Do not hot forge at red heat a silver contained billet, it could result in the cracking of the entire billet. After the laminates have been successfully diffused, trim all the sides with a hacksaw or power bandsaw. Cracking could occur in subsequent forging because of possible oxidation at the edges and uneven stacking.
Pattern Development
After diffusion and trimming of the edges, reduce by forging to desired thickness for appropriate pattern; 7mm to 5mm is recommended.
There are a number of procedures to develop and control patterns. Traditionally, the pattern is produced by using the Hatsuri-Tagane, which is a cutting chisel shaped like a wood gouge or a Maru Tagane, both produce a similar cut: a U-shaped channel. Put the diffused metals into a pitch block, pitch bowl, or large machinist vise. Carve through at least three layers. Remove from the holding device. Forge out until almost completely flat. Repeat the sequence of carving and forging at least four times observing the resultant pattern emerging. Continue forging until desired thickness needed. It is now ready to be raised or formed. Surface patterns on holloware can be created with the use of chisels. A metal drill bit may be used to develop a pattern, but it is necessary to use a round headed burr to smooth the bottom and top edge of each drilled hole because of the high angle of the drill's contour and point. If this is not done, folding of the top edge of the drilled hole will cause small cracks to appear in the pattern. Chiseling and drilling can be combined to produce patterns. A milling machine can be used to develop patterns. The use of a two fluted ball and mill can achieve similar results as the Hatsuri-Tagane. The object in patterning is to find a tool that will remove metal and produce smooth, long-angled, u-shaped channels or holes.
The diffused laminae can be treated as any single piece of metal. Patterns can be developed without tools that remove metal. The preparation and the procedures of diffusion are the same, except the shape of the laminates are rectangular or sliced to produce a bar from a large billet. After diffusion, forging on edge will result in a stripped pattern throughout. A variation of pattern development by edge or side forging and grinding can be accomplished. Before forging is started, the billet can be partially ground at right and/or oblique angles to the edges of the billet to partially destroy the parallelness. The edge forged pattern will remain the same on both sides and produce parallel strips that are distorted or wavy by the action of forging.
Blacksmithing techniques can be utilized for another type of pattern. Heat the bar or rectangular billet to red-orange if copper and copper alloys are present, and quickly place in a vise. While still red, twist with a wrench or similar tool. Repeat until desired twists are attained. While twisting, folding of the edges may occur along the outside of the twist. This should be removed by filing. Hot forge and draw out to rectangular bar form. The pattern of the simple twist can be sliced horizontally to create a pattern of great potential, the star or core of the twist. Another bar could also be partially twisted and hot split, forged and finished. Two other bars can be twisted, one to the right and one to the left, both rediffused and twisted again to produce a simple, elegant sculptural form.
Patterning has very few limitations. Those are of the manipulator. Patterns can be mathematically or geometrically conceptualized, but variables both planned and accidental occur that the manipulator must seize and take advantage of to produce a pattern that is other than mundane. Patterns can be etched to create a relief surface much like drift wood. The acids will react or attack the metals and alloys, in the billet, at different rates producing a tactile, relief surface pattern. Acidic solutions to etch and produce subtle colorations were used in Damascus Steel, Wootz Metal, true wrought iron, and of course the Japanese sword blade to emphasize the patterning produced during or after forge welding. The coloring is very important to emphasize patterning in Mokume-Gane. In Japan, a commercially available patina called Rokusho is used. Rokusho is an etchant and creates different oxidizes on the surface of the metals laminated. A Mokume-Gane patterned sheet before coloring shows little of the inherent pattern, but after being colored in Rokusho, the results are often spectacular. The final step in the process is to coat the surfaces with a protective film, such as wax.
Kuromi-do
Kuromi-do contains either 99% copper and 1% metallic arsenic or 97% copper and the remaining 3% a combination of iron, nickel, lead, arsenic, antimony, sulfur, aluminum, and phosphorus. Since it contains metallic arsenic, please wear a mask while filing and sanding. Annealing must be done under good ventilation, and wash hands thoroughly after using. We are not responsible for any accident caused by Kuromi-do or Rokusho.
Coloring of Kuromi-do
Boiling in a solution of Rokusho (Japanese patina compound) will give to Kuromi-do a blackish color. Mix the solution in a copper pan or Corning ware. Do not use stainless, aluminum, steel, brass, bronze, or enameled steel pans. Bring to a boil the following ingredients: Rokusho, 4 grams; copper sulfate, 4 grams; and distilled water, 1.8ml. Work under good ventilation.
1. Finish all forming, soldering, etc. Coloring is the last process in finishing a piece of metal work.
2. Remove all firescale before the piece is to be colored. Boil the piece in water to remove any surface grease and oils if it has been buffed. Or use a commercially available cleaner. Fantastik is a good grease remover. Clean in a strong pickle solution.
3. Cover the object with ground Daiken Japanese radish) if pieces contain silver and then dip into the boiling solution, keeping the piece constantly moving, for ten minutes. Remove from the solution and immediately immerse in a nearby container of water to avoid water spotting or particles of Rokusho drying on the surface of the piece.
4. Repeat step 3 several times until the coloration is achieved. It usually takes 30 minutes to one hour.
5. After coloration, coat with Renaissance Wax and buff with a soft cloth. Lacquer can also be used as a protective coating.
Sources:
Kuromido, Shakudo, Shibuichi, Rokusho, Tools
Komokin
Usagiya Building 3F No.1-10-10 Ueno
Taito-ku, Tokyo 107
Japan
Tel +81 3-3836-1791
Shakudo (2-4%), 25% Shibuichi, 26 layers in brass/copper and
silver/copper flat, straight and ladder patterns, and ready made
Mokume-Gane
Renaissance Wax
Talas Division of Tech Lab Services
130 Fifth Avenue
New York, NY 10011
212/736-7744
year of 1977 ©Hiroko Sato Pijanowski All Rights Reserved.